OnlyOffice部署【基于centos】
onlyoffice部署【centos】
一、上传out文件夹
基于上一篇打包文章,需要将out文件夹上传到CentOS。
此处不在赘述。
二、安装rabbitmq及其配置
更新yum(基本操作)
1
yum -y update
安装EPEL存储库
1
2
3
yum -y install epel-release
yum -y update
(无网环境自行下载)https://packagecloud.io/rabbitmq/erlang安装Erlang语言
1
2
3
yum -y install erlang socat
# 查看是否成功安装
erl -version下载并安装RabbitMq(自行选择方式,wget、curl、上传等)
1
2
3
4
5
6
7
8
9
10
11
12
https://github.com/rabbitmq/rabbitmq-server/releases/download/rabbitmq_v3_6_16/rabbitmq-server-3.6.16-1.el7.noarch.rpm
安装命令
rpm -ivh rabbitmq-server-3.6.16-1.el7.noarch.rpm
启动服务
systemctl start rabbitmq-server
查看服务状态
systemctl status rabbitmq-server
停止服务
systemctl stop rabbitmq-server
开启开机自启
systemctl enable rabbitmq-server添加RabbitMq用户(根据自己需要配置,一般生产无需配置)
1
2
3
4
5
6
7
8
9
10
11创建账号和密码
rabbitmqctl add_user 用户名 密码
设置用户角色:
rabbitmqctl set_user_tags 用户名 administrator
为用户添加资源权限,添加配置、写、读权限
rabbitmqctl set_permissions -p "/" 用户名 ".*" ".*" ".*"
修改用户密码
rabbitmqctl change_password 用户名 新密码
三、安装nginx及其配置
更新yum、安装EPEL存储库(Mq安装时一描述,不在赘述)
安装nginx
1
2
3
4
5
6
7
yum install nginx
启动Nginx服务:
systemctl start nginx
检查Nginx服务状态:
systemctl status nginx
设置Nginx开机自启:
systemctl enable nginx配置Nginx配置
1
2
3
4
5
6切换到配置文件目录
cd /etc/nginx/conf.d/
创建配置文件
touch nginx.conf
编辑(配置信息如下)
vim nginx.conf1
2
3
4
5
6
7
8
9
10
11
12
13
14
15
16
17
18
19
20
21
22
23
24
25
26
27
28
29
30
31map $http_host $this_host {
"" $host;
default $http_host;
}
map $http_x_forwarded_proto $the_scheme {
default $http_x_forwarded_proto;
"" $scheme;
}
map $http_x_forwarded_host $the_host {
default $http_x_forwarded_host;
"" $this_host;
}
map $http_upgrade $proxy_connection {
default upgrade;
"" close;
}
proxy_set_header Host $http_host;
proxy_set_header Upgrade $http_upgrade;
proxy_set_header Connection $proxy_connection;
proxy_set_header X-Forwarded-Host $the_host;
proxy_set_header X-Forwarded-Proto $the_scheme;
server {
listen 0.0.0.0:80;
listen [::]:80 default_server;
server_tokens off;
rewrite ^\/OfficeWeb(\/apps\/.*)$ /web-apps$1 redirect;
location / {
proxy_pass http://localhost:8000;
proxy_http_version 1.1;
}
}重启Nginx
1
nginx -s reload
四、修改项目配置文件
配置文件路径:./out/linux_64/onlyoffice/documentserver/server/Common/config/
不知道的配置项含义及其作用时,建议不要自己调整。
数据库(因项目需要,将数据库替换为Mysql)
数据库SQL路径:./out/linux_64/onlyoffice/documentserver/server/schema/
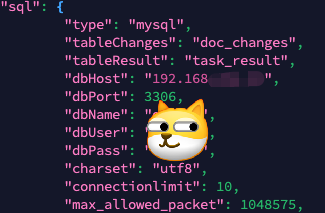
搜索sql关键字。type根据需要进行调整。dbHost(数据库ip)、dbPort(端口)、dbName(库名)、dbUser(用户名)、dbPass(密码)

Redis
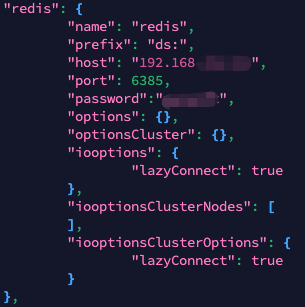
根据自己的需要,调整host、port、password(密码这个属性不一定存在,请自行测试!)

RabbitMq
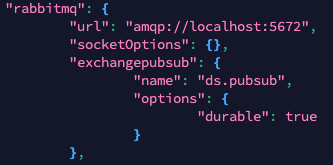
- 使用vim搜索关键词rabbitmq,因为我的rabbitmq与服务在同一主机,所以无需调整。

五、启动项目
生成字体数据信息
1
2
3
4
5
6
7
8
9
10
11
cd out/linux_64/onlyoffice/documentserver/
mkdir fonts
生成命令
LD_LIBRARY_PATH=${PWD}/server/FileConverter/bin server/tools/allfontsgen \
--input="${PWD}/core-fonts" \
--allfonts-web="${PWD}/sdkjs/common/AllFonts.js" \
--allfonts="${PWD}/server/FileConverter/bin/AllFonts.js" \
--images="${PWD}/sdkjs/common/Images" \
--selection="${PWD}/server/FileConverter/bin/font_selection.bin" \
--output-web='fonts' \
--use-system="true"生成演示主题
1
2
3
4
5
6
cd out/linux_64/onlyoffice/documentserver/
生成命令
LD_LIBRARY_PATH=${PWD}/server/FileConverter/bin server/tools/allthemesgen \
--converter-dir="${PWD}/server/FileConverter/bin"\
--src="${PWD}/sdkjs/slide/themes"\
--output="${PWD}/sdkjs/common/Images"启动FileConverter
1
2
3
4
5
6
7
cd out/linux_64/onlyoffice/documentserver/server/FileConverter
环境变量
export LD_LIBRARY_PATH=$PWD/bin
export NODE_ENV=development-linux
export NODE_CONFIG_DIR=$PWD/../Common/config ./converter
守护执行
nohup ./converter > /xxxx/converter.log 2>&1 &启动DocService
1
2
3
4
5
6
cd out/linux_64/onlyoffice/documentserver/server/DocService
环境变量
export NODE_ENV=development-linux
export NODE_CONFIG_DIR=$PWD/../Common/config
守护执行
nohup ./docservice > /xxxx/docservice.log 2>&1 &